
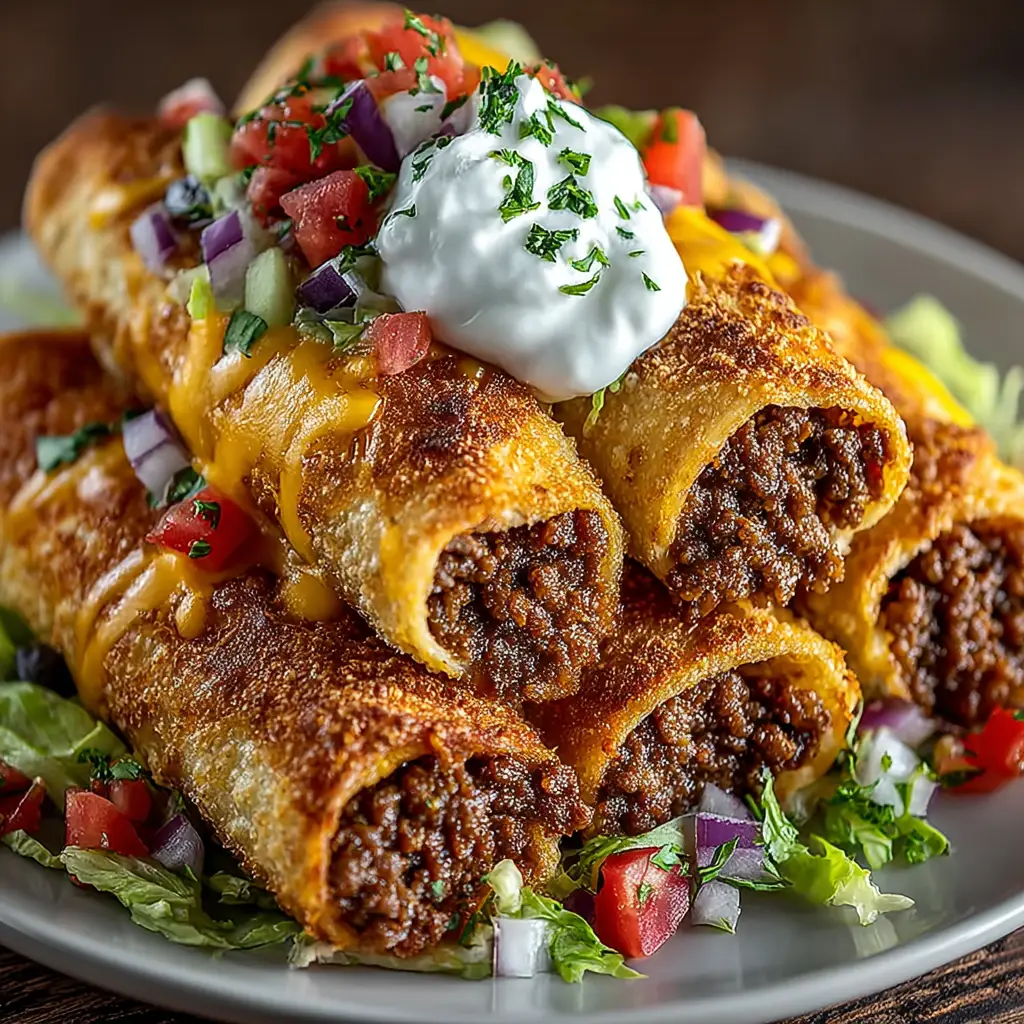
Introduction to Cheesy Taco Sticks
Hey there, fellow food lovers! If you’re anything like me, you know that life can get pretty hectic. Between juggling work, family, and everything in between, finding time to whip up a delicious snack can feel like a daunting task. That’s where my Cheesy Taco Sticks come to the rescue! These delightful little treats are not only quick to make but also bursting with the flavors we all adore. Perfect for a busy day or a fun gathering, they’re sure to impress your loved ones and satisfy those snack cravings!
Why You’ll Love This Cheesy Taco Sticks
Let’s be honest—who doesn’t love a snack that’s both easy and delicious? These Cheesy Taco Sticks are a breeze to whip up, taking just 25 minutes from start to finish. The combination of gooey cheese and savory taco flavors makes them irresistible. Plus, they’re perfect for any occasion, whether it’s a quick after-school treat or a fun appetizer for game night. You’ll be the hero of snack time!
Ingredients for Cheesy Taco Sticks
Gathering the right ingredients is key to making these Cheesy Taco Sticks a hit! Here’s what you’ll need:
- Taco seasoning: This spice blend brings that classic taco flavor to your filling. You can use store-bought or make your own for a personal touch.
- Shredded cheese: I love using a mix of cheddar and Monterey Jack for that gooey goodness. Feel free to experiment with your favorite cheese!
- Crescent roll dough: This flaky dough is the perfect vessel for our taco filling. It’s easy to work with and adds a delightful crunch.
- Cooked ground beef or turkey: This is the protein base of our snack. Ground turkey is a leaner option, while beef adds a rich flavor.
- Diced tomatoes: Fresh or canned, these add a juicy burst of flavor. They also help keep the filling moist.
- Chopped onions: Onions bring a sweet and savory depth to the mix. You can use red, yellow, or even green onions for a milder taste.
- Sliced olives: These add a briny kick that complements the other flavors beautifully. If you’re not a fan, feel free to leave them out!
For exact measurements, check the bottom of the article where you can find everything listed for easy printing. Now, let’s get cooking!
How to Make Cheesy Taco Sticks
Now that we have our ingredients ready, let’s dive into the fun part—making these Cheesy Taco Sticks! Follow these simple steps, and you’ll have a delicious snack in no time.
Step 1: Preheat the Oven
First things first, preheat your oven to 375°F (190°C). Preheating is crucial because it ensures that your Cheesy Taco Sticks bake evenly. A hot oven helps achieve that golden-brown color and crispy texture we all love!
Step 2: Prepare the Meat Mixture
In a mixing bowl, combine your cooked ground beef or turkey with the taco seasoning. This step is essential for infusing the meat with that classic taco flavor. Make sure to mix it well, so every bite is packed with deliciousness. Trust me, your taste buds will thank you!
Step 3: Unroll the Crescent Roll Dough
Next, carefully unroll the crescent roll dough. It can be a bit tricky, but take your time. Gently separate the dough into triangles. If it tears, don’t worry! Just pinch it back together. Each triangle will be the perfect pocket for our tasty filling.
Step 4: Assemble the Taco Sticks
Now comes the fun part—assembling your Cheesy Taco Sticks! Place a spoonful of the meat mixture on the wide end of each triangle. Then, sprinkle on some shredded cheese, diced tomatoes, onions, and olives. The layering of these ingredients is what makes each bite so flavorful. Roll the triangle up from the wide end to the point, tucking in the filling as you go. It’s like wrapping a little present!
Step 5: Bake the Cheesy Taco Sticks
Place your rolled sticks on a baking sheet lined with parchment paper. Bake them in the preheated oven for 12-15 minutes. Keep an eye on them! You want them to be golden brown and crispy. Once they’re done, let them cool slightly before serving. The aroma will have everyone gathering around, eager to dig in!
Tips for Success
- Make sure your oven is fully preheated for even baking.
- Don’t overfill the dough; a little goes a long way!
- Experiment with different cheeses for unique flavors.
- For extra crunch, brush the tops with a bit of melted butter before baking.
- Let the sticks cool for a few minutes to avoid burning your mouth!
Equipment Needed
- Baking sheet: A standard baking sheet works perfectly. If you don’t have one, a large oven-safe dish will do.
- Parchment paper: This helps prevent sticking. If you’re out, lightly greasing the baking sheet is a good alternative.
- Mixing bowl: Any bowl will work for mixing your ingredients. A large one is best for easy stirring.
- Measuring cups: Handy for portioning ingredients. If you don’t have them, just use a regular cup!
Variations of Cheesy Taco Sticks
- Vegetarian Option: Swap the ground meat for black beans or lentils. Add extra veggies like bell peppers or corn for a hearty filling.
- Spicy Kick: Mix in some diced jalapeños or a dash of hot sauce to the meat mixture for those who love a little heat.
- Cheese Lovers: Use a blend of pepper jack and cheddar for an extra cheesy experience. You can never have too much cheese!
- Gluten-Free: Substitute the crescent roll dough with gluten-free dough or use corn tortillas for a different twist.
- Breakfast Taco Sticks: Fill with scrambled eggs, cheese, and your choice of breakfast meat for a delightful morning treat.
Serving Suggestions for Cheesy Taco Sticks
- Salsa: Serve with a side of fresh salsa for a zesty dip that complements the flavors.
- Sour Cream: A dollop of sour cream adds creaminess and balances the spices beautifully.
- Guacamole: Pair with guacamole for a rich, creamy contrast that everyone will love.
- Fresh Veggies: Add a side of crunchy veggies like carrot sticks or cucumber slices for a refreshing touch.
- Presentation: Arrange the sticks on a colorful platter for a fun and inviting snack display!
FAQs about Cheesy Taco Sticks
Got questions about these Cheesy Taco Sticks? I’ve got you covered! Here are some common queries that might pop up as you whip up this delightful snack.
Can I make Cheesy Taco Sticks ahead of time?
Absolutely! You can prepare the filling and assemble the sticks in advance. Just store them in the fridge for up to a day before baking. This makes it super convenient for busy days!
What can I use instead of ground beef or turkey?
If you’re looking for alternatives, try using shredded chicken, black beans, or even tofu for a vegetarian option. The flavors will still shine through!
How do I store leftovers?
Store any leftover Cheesy Taco Sticks in an airtight container in the fridge for up to three days. Reheat them in the oven for a few minutes to regain that crispy texture.
Can I freeze Cheesy Taco Sticks?
Yes! These tasty treats freeze well. Just assemble them, place them on a baking sheet, and freeze until solid. Then transfer to a freezer bag. Bake from frozen, adding a few extra minutes to the cooking time.
What dipping sauces pair well with Cheesy Taco Sticks?
These sticks are delicious with salsa, sour cream, or guacamole. You can even try a spicy ranch dressing for a fun twist!
Final Thoughts
Making Cheesy Taco Sticks is more than just whipping up a quick snack; it’s about creating joyful moments in the kitchen. The delightful aroma wafting through your home as they bake is sure to bring smiles to your family’s faces. Whether you’re enjoying them during a busy weeknight or serving them at a gathering, these sticks are a hit every time. Plus, the versatility of this recipe means you can customize it to suit your family’s tastes. So, roll up your sleeves, gather your loved ones, and dive into this cheesy, flavorful adventure together!
Print
Cheesy Taco Sticks: A Quick and Delicious Snack Idea!
- Prep Time: 10 minutes
- Cook Time: 15 minutes
- Total Time: 25 minutes
- Yield: 12 sticks 1x
- Category: Snack
- Method: Baking
- Cuisine: Mexican
- Diet: Low Calorie
Description
Cheesy Taco Sticks are a quick and delicious snack that combines the flavors of tacos with gooey cheese, perfect for any occasion.
Ingredients
- 1 package of taco seasoning
- 1 cup shredded cheese
- 1 package of crescent roll dough
- 1 cup cooked ground beef or turkey
- 1/2 cup diced tomatoes
- 1/4 cup chopped onions
- 1/4 cup sliced olives
Instructions
- Preheat the oven to 375°F (190°C).
- In a bowl, mix the cooked ground beef or turkey with taco seasoning.
- Unroll the crescent roll dough and separate it into triangles.
- Place a spoonful of the meat mixture on the wide end of each triangle.
- Add a sprinkle of cheese, diced tomatoes, onions, and olives on top of the meat.
- Roll up the triangles starting from the wide end to the point.
- Place the rolled sticks on a baking sheet lined with parchment paper.
- Bake for 12-15 minutes or until golden brown.
- Let cool slightly before serving.
Notes
- Serve with salsa or sour cream for dipping.
- Feel free to customize the filling with your favorite taco ingredients.
- These can be made ahead of time and frozen for later use.
Nutrition
- Serving Size: 1 stick
- Calories: 150
- Sugar: 1g
- Sodium: 300mg
- Fat: 8g
- Saturated Fat: 3g
- Unsaturated Fat: 4g
- Trans Fat: 0g
- Carbohydrates: 15g
- Fiber: 1g
- Protein: 6g
- Cholesterol: 20mg