
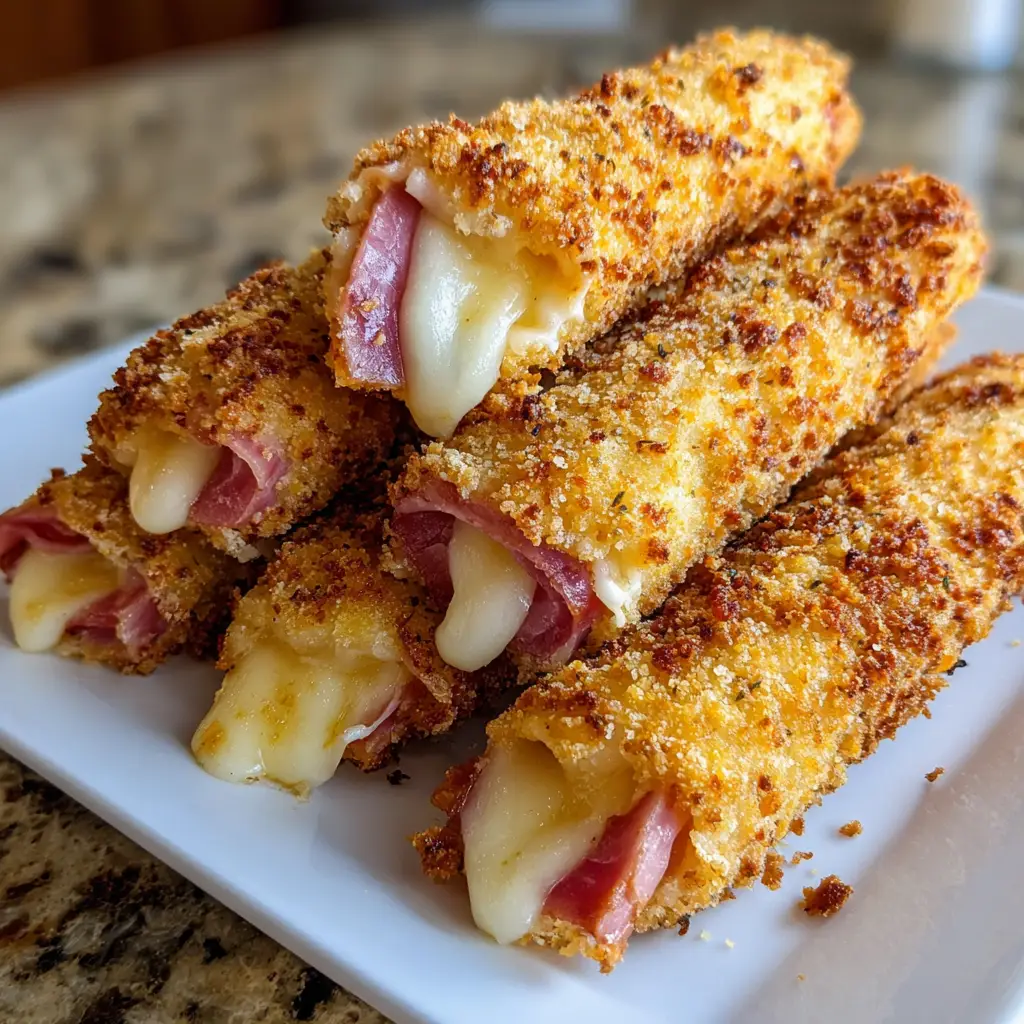
Introduction to Ham and Cheese Sticks
As a busy mom, I know how precious time can be, especially when it comes to meal prep. That’s why I absolutely adore these Ham and Cheese Sticks! They’re not just a quick solution for a hectic day; they’re also a delightful treat that my family loves. Imagine the savory taste of ham paired with gooey melted cheese, all wrapped up in a crispy coating. It’s the kind of snack that can impress your loved ones or satisfy those late-night cravings. Trust me, once you try these, they’ll become a staple in your kitchen!
Why You’ll Love This Ham and Cheese Sticks
These Ham and Cheese Sticks are a lifesaver for busy days! They come together in just 20 minutes, making them perfect for after-school snacks or last-minute gatherings. The combination of crispy, cheesy, and savory flavors is simply irresistible. Plus, they’re versatile enough to please even the pickiest eaters in your family. You’ll love how easy they are to whip up, and your family will love devouring them!
Ingredients for Ham and Cheese Sticks
Gathering the right ingredients is the first step to creating these delicious Ham and Cheese Sticks. Here’s what you’ll need:
- Ham: Choose your favorite type, whether it’s smoked, honey, or even turkey ham for a lighter option.
- Cheese: I love using cheddar for its sharpness, but mozzarella or Swiss work beautifully too!
- Breadcrumbs: These give the sticks their crispy exterior. You can use plain or seasoned breadcrumbs for added flavor.
- Eggs: Beaten eggs act as the glue that holds everything together during the breading process.
- Flour: A light dusting of flour helps the egg and breadcrumbs stick better to the ham and cheese rolls.
- Salt and Pepper: Simple seasonings that enhance the overall flavor. Feel free to add your favorite spices!
- Oil: For frying, I recommend vegetable or canola oil for a neutral taste. You can also bake them for a healthier twist!
For exact quantities, check the bottom of the article where you can find everything available for printing. Happy cooking!
How to Make Ham and Cheese Sticks
Now that you have your ingredients ready, let’s dive into the fun part—making these delightful Ham and Cheese Sticks! Follow these simple steps, and you’ll have a tasty snack in no time.
Prepare the Ham and Cheese
Start by laying out your slices of ham on a clean surface. Place a slice of cheese on top of each ham slice. This is where the magic begins! Make sure to roll the ham and cheese tightly. A snug roll ensures that the cheese stays inside while cooking, creating that gooey goodness we all love.
Set Up the Breading Station
Next, it’s time to set up your breading station. Grab three shallow bowls. In the first bowl, add some flour. In the second, beat your eggs until they’re nice and frothy. Finally, fill the third bowl with breadcrumbs. This setup makes the breading process smooth and efficient, so you can get to frying faster!
Bread the Ham and Cheese Rolls
Now, let’s get those rolls coated! Take each ham and cheese roll and dredge it in the flour first. This helps the egg stick better. Then, dip it into the beaten eggs, ensuring it’s fully coated. Finally, roll it in the breadcrumbs until it’s well covered. This triple-dipping process gives your Ham and Cheese Sticks that irresistible crunch!
Fry the Rolls
Heat oil in a frying pan over medium heat. You want enough oil to cover the bottom of the pan, but not so much that it splashes everywhere. Once the oil is hot, carefully place the breaded rolls in the pan. Fry them for about 3-4 minutes on each side, or until they turn a beautiful golden brown. Keep an eye on them; nobody likes burnt snacks!
Drain and Serve
Once your Ham and Cheese Sticks are golden and crispy, it’s time to drain them. Use a slotted spoon to remove them from the oil and place them on a plate lined with paper towels. This helps absorb any excess oil. Serve them warm with your favorite dipping sauce, and watch them disappear!
Tips for Success
- Make sure your oil is hot enough before frying; a drop of water should sizzle when it hits the oil.
- For extra flavor, mix herbs or spices into your breadcrumbs.
- Don’t overcrowd the pan; fry in batches for even cooking.
- Let the rolls cool slightly before serving to avoid burning your mouth!
- Experiment with different cheeses for unique flavor combinations.
Equipment Needed
- Frying Pan: A non-stick skillet works great, but any frying pan will do.
- Shallow Bowls: Use any bowls for your breading station; pie plates are perfect!
- Slotted Spoon: This helps drain the rolls; a regular spoon can work in a pinch.
- Paper Towels: Essential for draining excess oil; you can also use a wire rack.
Variations of Ham and Cheese Sticks
- Spicy Kick: Add a slice of jalapeño or a sprinkle of crushed red pepper flakes inside the roll for a spicy twist.
- Herbed Delight: Mix dried herbs like oregano or basil into the breadcrumbs for an aromatic flavor boost.
- Veggie Boost: Incorporate thinly sliced bell peppers or spinach with the ham and cheese for added nutrition.
- Gluten-Free Option: Substitute regular breadcrumbs with gluten-free breadcrumbs or crushed rice cereal.
- Cheese Lovers: Use a combination of cheeses like pepper jack and gouda for a rich, melty experience.
Serving Suggestions for Ham and Cheese Sticks
- Pair with a zesty dipping sauce like honey mustard or ranch for extra flavor.
- Serve alongside a fresh garden salad for a balanced meal.
- Offer a side of crispy sweet potato fries for a fun twist.
- Complement with a chilled glass of lemonade or iced tea.
- Arrange on a colorful platter for a visually appealing presentation.
FAQs about Ham and Cheese Sticks
Can I bake Ham and Cheese Sticks instead of frying them?
Absolutely! Baking is a healthier option. Preheat your oven to 400°F (200°C) and place the breaded rolls on a baking sheet lined with parchment paper. Bake for about 15-20 minutes, flipping halfway through, until they’re golden brown.
What dipping sauces go well with Ham and Cheese Sticks?
These sticks pair wonderfully with a variety of dipping sauces. Try honey mustard, ranch dressing, or even a spicy sriracha mayo for a kick. The options are endless!
Can I make Ham and Cheese Sticks ahead of time?
Yes! You can prepare the rolls and store them in the fridge for up to a day before frying. Just remember to let them come to room temperature before cooking for the best results.
What can I substitute for ham in this recipe?
If you’re looking for alternatives, turkey or chicken slices work well. For a vegetarian option, consider using roasted vegetables or a plant-based deli slice.
How do I store leftover Ham and Cheese Sticks?
Store any leftovers in an airtight container in the fridge for up to three days. Reheat them in the oven or air fryer to restore their crispiness!
Final Thoughts
Making Ham and Cheese Sticks is more than just cooking; it’s about creating joyful moments in the kitchen. The aroma of sizzling rolls fills the air, and the anticipation builds as you gather your family around the table. Watching their faces light up with delight as they take that first bite is priceless. These sticks are not only a quick snack but also a canvas for creativity. Whether you’re experimenting with flavors or sharing them with loved ones, this recipe brings warmth and happiness to any occasion. So, roll up your sleeves and enjoy the delicious journey!
Print
Ham and Cheese Sticks: A Quick and Tasty Snack!
- Prep Time: 10 minutes
- Cook Time: 10 minutes
- Total Time: 20 minutes
- Yield: 4 servings 1x
- Category: Snack
- Method: Frying
- Cuisine: American
- Diet: Low Calorie
Description
Ham and Cheese Sticks are a quick and delicious snack that combines savory ham and melted cheese, perfect for any occasion.
Ingredients
- 8 slices of ham
- 8 slices of cheese
- 1 cup of breadcrumbs
- 2 eggs
- 1/2 cup of flour
- Salt and pepper to taste
- Oil for frying
Instructions
- Lay out the ham slices and place a slice of cheese on top of each.
- Roll the ham and cheese tightly and secure with a toothpick if necessary.
- Set up a breading station with flour, beaten eggs, and breadcrumbs.
- Dredge each ham and cheese roll in flour, dip in egg, and coat with breadcrumbs.
- Heat oil in a frying pan over medium heat.
- Fry the rolls until golden brown on all sides, about 3-4 minutes.
- Remove from oil and drain on paper towels.
- Serve warm with your favorite dipping sauce.
Notes
- For a healthier option, bake the rolls in the oven instead of frying.
- Feel free to add spices or herbs to the breadcrumbs for extra flavor.
- These can be made ahead of time and reheated in the oven.
Nutrition
- Serving Size: 2 sticks
- Calories: 250
- Sugar: 1g
- Sodium: 800mg
- Fat: 15g
- Saturated Fat: 6g
- Unsaturated Fat: 7g
- Trans Fat: 0g
- Carbohydrates: 20g
- Fiber: 1g
- Protein: 15g
- Cholesterol: 100mg